Exporting Images From Lightroom Classic - Why Maximizing image quality settings may not be the right choice
Photographers are always looking for ways to maximize the quality of their images, especially when sharing our images with others. We zoom in to check focus at 100% and retouch faces at 200%, heck we might even zoom in to 400% to remove a stray piece of lint from a sweater and when we are finally satisfied with our images, we bump up the quality settings to MAXIMUM to ensure every last ounce of pixel magic is squeezed into the final image we share.
But those high quality images come with a cost… very large, at times prohibitively large, file sizes.

“Scotty, we need more pixels!” “But Captain, I’m given’ you all we got, the quality slider is set to 100!”
“Why not share the best version of our images?”, I hear you. You spent a lot of time planning, scouting, composing, re-composing, capturing and finally editing your image. You want everyone to see your latest signature shot in all of it’s glory. However, you’re likely sharing your image on a website, a forum, your blog or across one of your social media outlets and you just don’t need your shared image to be that big.
Before we go any further, I’m going to call on the photographer with the red shirt on, yes you there, what’s your question? “But, what if I’m going to print the image, wouldn’t I want the highest resolution and image quality for my print?” Great question Red, I’ll answer your question with a question of my own, “Are you printing the image?” If the answer is no, keep reading because I’m going to share some easy to follow tips about getting high quality images with smaller file sizes. If you are printing, that’s great! We should all be printing our images. However, that’s a topic for a different blog post, so stay tuned 😉
For the safety of all passengers, we automatically resize and format your images…
If you’re sharing your images on the web, it’s almost certain the hosting platform is sharing a resized version of what you upload. For example, Squarespace creates 7 versions of your image to ensure the perfect display on any screen size. Facebook happily tells you they automatically resize and format your images to ensure they appear in the highest possible quality. There are several reasons these hosting platforms want to resize our images, but the main reason is to ensure the images load quickly as everyone scrolls through your feed, no matter what device they are using. But why leave it up to the hosting platform to resize your image? Sure they do a nice job, but they are compressing an already compressed jpeg file. You can eliminate this step by taking control of the export settings in Lightroom and use your RAW image to generate a high quality image perfectly resized for any given platform.
Recently released cameras produce very high resolution images. The Canon R5 creates a 8192x5464px image and the Sony A1 can produce images at 8640x5760px. It’s not just new cameras producing high-res images, current cell phone cameras are cranking out images at 3024x4032px. Why does this matter? Because, even after a moderate crop, you are still working with an image that is much larger than you need for posting on your favorite social media or web platform.
Facebook recommends images be no wider than 2048px, Twitter defaults to 600x335px but expands to 1200x675px and Instagram prefers to keep things square at 1080x1080px. There are additional posting formats available, like the 4:5 ratio on Instagram that extends the image height to 1350px, but we will stick with the basics for now. Once you get the hang of the standard formats, making an adjustments for one of the accepted variations will be easy. Recommend image resolutions along with any acceptable variations are easily found on the respective help pages or with a quick web search.
Optimizing your export settings will dramatically reduce your file size while retaining the image quality you need
Lightroom Classic provides a variety of tools for exporting your images. The default export settings in LrC have the Quality slider maxed out to 100 and the image sizing unchecked or turned off.

Lightroom Classic’s default setting for Full-Sized JPEGs
But you don’t need to keep these settings just because they are the default settings. (You didn’t leave the develop sliders at their default settings).
Here’s a fun fact:
That quality slider you see in the export settings doesn’t change the output quality for every point along the scale [0-100]. Instead, it adjusts the quality in 13 increments along the scale of 0-100. Photoshop uses a jpeg quality scale of 0-12 which is also 13 increments. Coincidence? Not likley.

Adjusting the quality settings will have the greatest impact on your file size, but properly sizing the image also helps quite a bit. Let’s make a few adjustments and see where we land in terms of image quality and file size. My “test” image is a landscape image taken with a DSLR and edited in LrC and Photoshop. The PSD file on the hard drive is a whopping 196.6MB.
The first export setting will be the LrC Default with the Quality slider set to 100 and the Image Sizing unchecked. Next, I’ll only resize the image to Facebook’s recommended width of 2048px. Next I’ll reduce the Quality to 82 and leave the Resize to Fit set to a width of 2048px. Finally, I’ll push LrC a bit and adjust the Quality to 62 and adjust Resize to Fit to a width of 1080px.
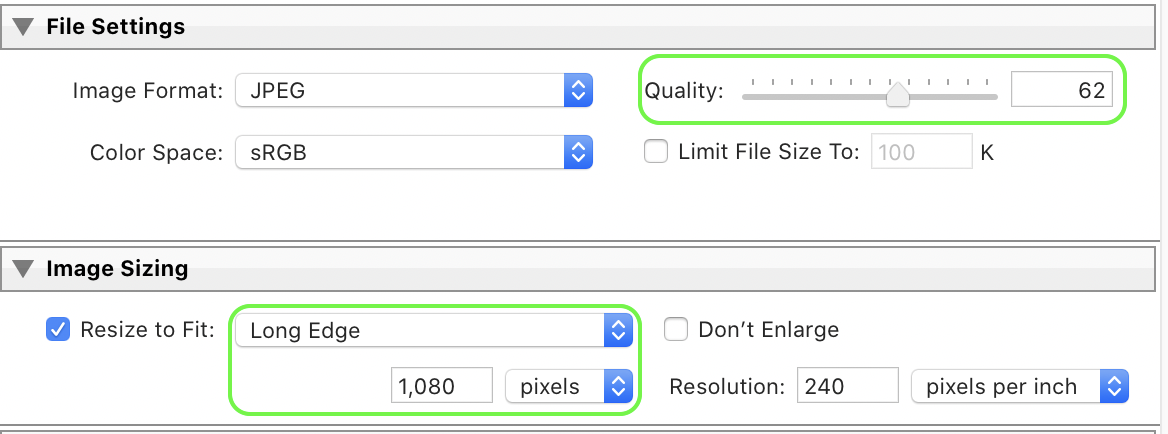
LrC Export Settings for the final export
I encourage you to use one of your own images and follow along with these steps. The first thing you will notice is the export time is much faster. The next thing you should note is the dramatic drop in file size. The chart below shows the impact on file size with the adjustment settings I described above.

(Q = Quality Slider value & R = Resize value in pixels)
The first image (with the default settings) is still quite large at 13MB and it will definitely be resized again if you share it on social media. By resizing the image to the FB recommended 2048px width, the image file size is reduced to a fourth of its default size and by adjusting the quality slider to 82 the file size is further reduced. The image below has the quality set to 62 and has been resized to a width of 1080px.

The results are consistent across all of the images I exported with these settings. Here’s another example, the portrait below was exported with the same values described above. The image file sizes range from 8MB down to 223KB. I put them in random order, can you tell the difference?

Fun Fact: The difference between an 8MB file and 223KB file is 7.77MB or a 3,487% smaller file size!
I’m not going to lie, if I didn’t write it down when I created the comparison, I couldn’t tell one from the other. All four of the images look great and that’s really what this conversation is all about. The image files we see in our social media streams are vastly smaller than the files our cameras are capturing. If you are not optimizing your image files as you export them, your web host or social media provider will most certainly do it for you. But you have the power to share the best version of your images so they not only meet the required screen resolution, they also look great at that resolution.
Notes:
Randomized Images: Q82, Default, Q62, Q100
LrC Quality setting of 62 is the equivalent of the PS default jpeg export setting of 8 (High Quality)